Angel Food Cake
Baking is one place where you don't have a lot of wiggle room. Read a recipe wrong or try an ingredient substitution, and the results can become very unpredictable. So when a recipe says to "whip to firm peaks," you know you have to get it right! Here's a visual guide to help you out.
The stages of "peaks" is the same for beating egg whites or making whipped cream. In this guide, I'm using egg whites with a little sugar to show each stage (except for the last picture, which shows over-whipped cream). We're using a standing mixer on the second to highest setting, but you can also use a hand mixer. If you need a work-out, you can also try whipping them by hand!
The stages of "peaks" is the same for beating egg whites or making whipped cream. In this guide, I'm using egg whites with a little sugar to show each stage (except for the last picture, which shows over-whipped cream). We're using a standing mixer on the second to highest setting, but you can also use a hand mixer. If you need a work-out, you can also try whipping them by hand!
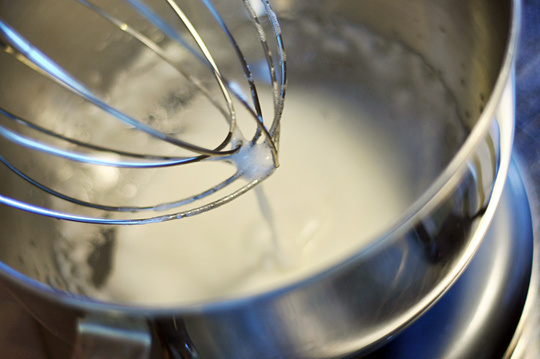
Foamy Stage of Egg Whites
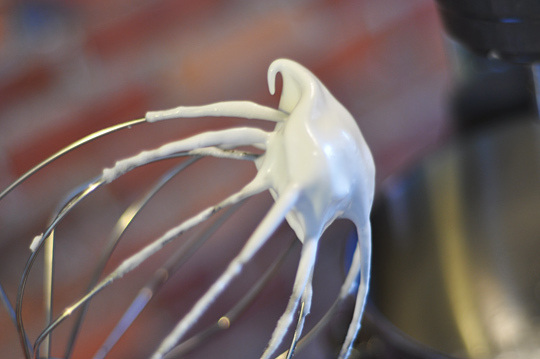
Soft Peaks of Egg Whites
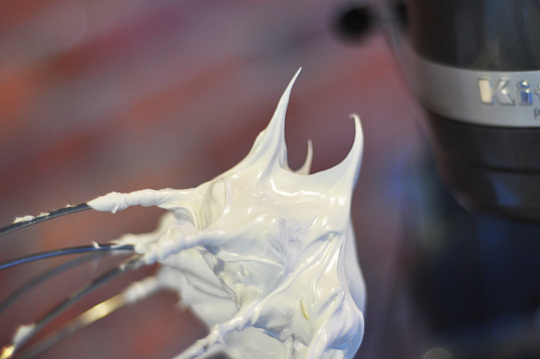
Stiff Peaks of Egg Whites
1. No Peaks - After a few minutes of whipping, the egg whites are getting foamy and opaque, but they're still so liquidy that they won't hold a shape.
2. Soft Peak - When you turn your whisk upside down, the peaks are just starting to hold. They're soft and melt back into themselves.
3. Firm Peak - Now when you turn your whisk upside down, the peaks will hold and the ridges are more distinct, but the tips fold back on themselves.
4. Stiff Peak - Turn the whisk upside down, and those peaks hold proudly! They should point straight up without collapsing at all (or maybe a little bit just at the very tips). The mixture is thick and heavy and is glossy.
5. Over-beating - It's possible to take it too far. After the stiff peak stage, egg whites will start to look grainy and dull. They will eventually collapse back on themselves. Whipped cream will also get grainy and will start to separate into fat and liquid.
There's not much to do about over-whipped cream other than keep whipping until it turns into butter. If you catch egg whites just as they are starting to turn grainy, you can try adding another egg white into the bowl to bring it back. Also, sugar stabilizes egg whites. If you're making meringue or anything where sugar has been added during whipping, you don't have to worry about over-beating them as much.
Choux Pastry
Pâte à choux, or choux paste, is a paste of flour, water, butter, and eggs. After the paste has been prepared, it gets piped out into various shapes and baked. The liquid in the dough puffs up the pastry as it evaporates in the oven, creating a hard outer shell and a moist interior with large air pockets.
You never really serve pâte à choux by itself. Other ingredients get added to the dough to make it more flavorful or the baked puffs get filled with pastry cream, ice cream, or other filling.
Steps for Preparing Pâte à Choux
How to Bake Pâte à Choux
You never really serve pâte à choux by itself. Other ingredients get added to the dough to make it more flavorful or the baked puffs get filled with pastry cream, ice cream, or other filling.
Steps for Preparing Pâte à Choux
- In a medium saucepan over medium-high heat, bring the water, butter, and pinch of salt to a rolling boil.
- Add the flour all at once. Remove the pan from heat and stir the mixture until the water has been fully absorbed and it looks like mashed potatoes.
- Set the pan back over medium-high heat and stir the paste vigorously to dry it out slightly. This should take about 3-5 minutes and you know the paste is ready when it glistens slightly and a spoon can stand straight up in the middle without falling over.
- Remove the pan from heat and transfer the mash to a mixing bowl. Let it cool to room temperature. You can speed up the cooling process by stirring and folding the mash.
- Beat the eggs together and then stir them into the mash in four separate additions. Make sure the egg has been absorbed completely into the paste before adding the next addition. After you've added all the eggs, you'll know things are good if you scoop a little onto a spoon, hold the spoon upside down, and you see the paste sliding and drooping a little. If it's still as stiff as mashed potatoes, add another egg.
How to Bake Pâte à Choux
- Pre-heat the oven to 425°.
- Pipe the mash onto sheet pans into your desired shape and brush them with egg wash or milk. Put the pans in the oven and immediately lower the heat to 375°. Bake until the dough is puffed, golden brown, and hard to the touch (cooking time will depend on the shape being baked).
- Lower the heat to 300° and continue baking for another ten minutes or so to dry them out. You can test this by breaking one open and checking the interior. If the interior is still very wet and eggy, bake them for another few minutes.
- After taking them from the oven, poke each pastry with a toothpick so that steam can escape. Un-poked pastries will trap the steam and get soggy. Let the pastries cool completely before filling them.